|
|
Othello Strategy Guide
Credits- This guide has been send to me by Olivier Casile (Forest's author). It is originating from the FFO (French Othello Federation) and is the electronic equivalent of a booklet created and distributed by Emmanuel Lazard. Finaly, my brother (Fabien Arsac) made the english translation (that was quite a job). Thus I want to thank them all for providing us with such a good strategy courses.
This copy is distributed with the authorization of Emmanuel and the F.F.O. The printed version of this booklet (with nice round discs) is available from the F.F.O. for 20
French Francs (shipping included) by check payable to the F.F.O.
FEDERATION FRANCAISE D'OTHELLO, BP 383, 75626 Paris Cedex 13, (1) 45 35 55 86
(C) Emmanuel Lazard (and the entire F.F.O. team) March 1993
This text may not be further distributed without the explicit agreement of the author.
Foreword- The rule says the winner is the player with the most discs of his own
colour at the end of a game. People discovering the game too
often tend to implement this final goal as a strategy in the
short run: they try gathering the biggest amount of discs
of their own colour throughout the game. To do so, they chose
each time the move that will flip the biggest number of
opposite discs.
This technique is known as maximization. Fortunately, after a
few games against an experienced player, it becomes obvious
that such a strategy is poor, as we will try to demonstrate
with an example.
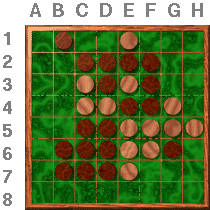
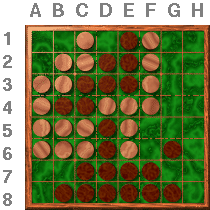
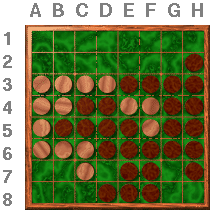
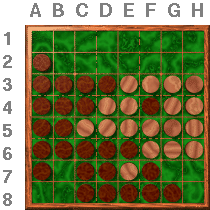
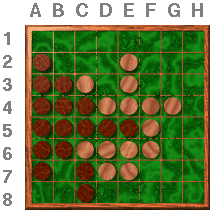
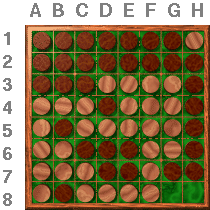
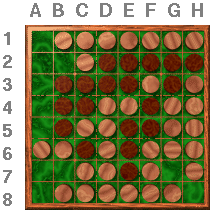
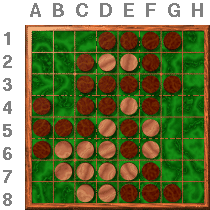
Maximization- In the following picture, Black only has one disc left, and four
turns are left to play. Will White positively be the victor?
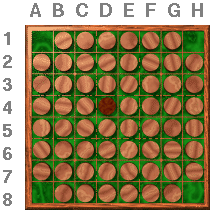
Black can play A1 or H8 and anyway, he will be playing the last few
moves (White will pass each time) and will win over White by 40
to 24.
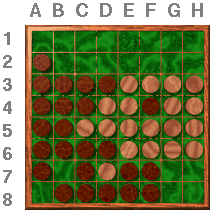
So it stands to reason that having many discs, even when there are
but a few turns to play, does not obligatorily mean victory. In
our example, White has a lot of discs, but they are vulnerable,
as they can be flipped by the opponent. Having a lot of discs
is only valuable if they never can be flipped until the game
ends. These discs are called definitive discs. Of course,
getting definitive discs before the last few turns of the game
is a difficult task, but let us first have a look at a few examples
of definitive discs.
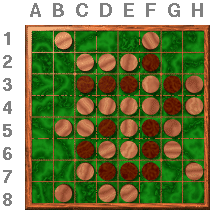
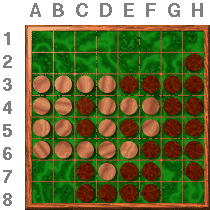
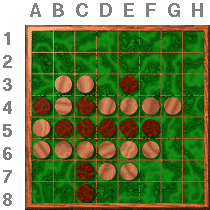
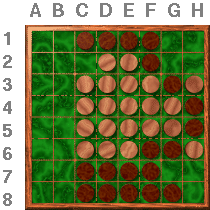
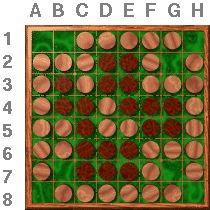
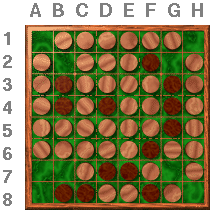
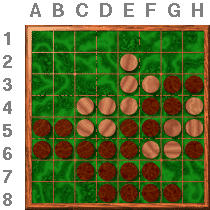
Definitive discs, position strategy- It is impossible to flip a disc placed in a corner because he cannot
be outflanked. Placing a disc in a corner is a good means of
winning a definitive disc.
On the top of that, once a corner is taken by a disc, the surrounding
same-coloured discs often become definitive discs.
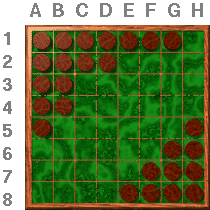
In this example, the 26 black discs are definitive, regardless of the
colour of other discs on the board, and Black won't lose these
discs till the end of the game.
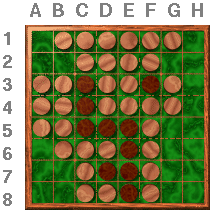
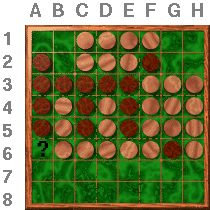
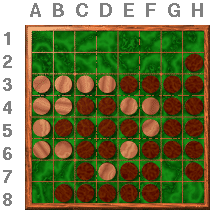
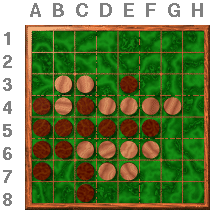
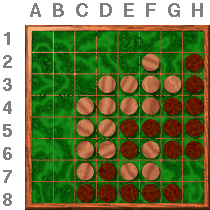
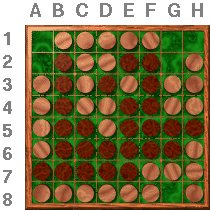
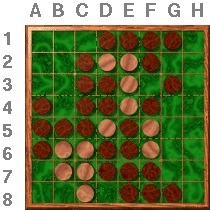
Definitive discs, position strategy (2)- In the same way, in the example below, Black can play H8 and
henceforth freezes 23 definitive discs (rows G and H, lines 7
and 8 and disc F6).
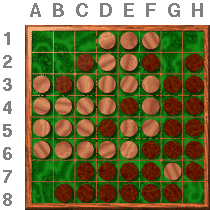
Black must play...
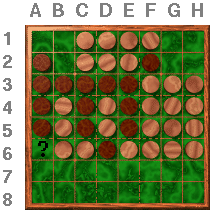
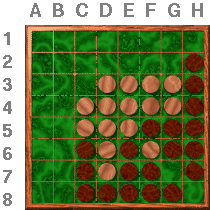
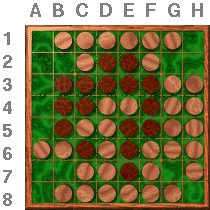
After Black's move to H8

Black is now most likely to win. Indeed, he already owns 23
definitive discs; it only takes ten more black discs on the
board at game end to succeed.
In an Othello game, corner discs are extremely important: as
definitive discs, they allow to take over the borders and make
them definitive as well. Of course, there can be exception, as
depicted later on. Let us only bear in mind that giving up a
corner without compensation is risky.
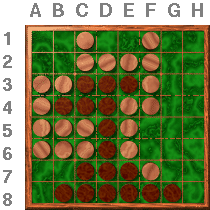
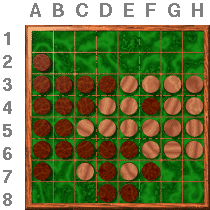
Definitive discs, position strategy (3)- The easier way to avoid giving up a corner is not to play the
surrounding squares, that is to say weak squares C and X. As a
matter of fact, one can only play beside an opposite disc (the one
flipped). Thus, one will not be able to play a corner if none of
the three surrounding squares is occupied.
In following picture, Black unwisely played X B7, believing that
White would not be able to play corner A8 because there was no
white disc on the diagonal. Nevertheless, White can play D8,
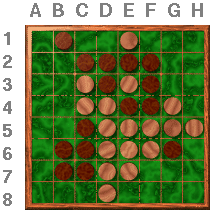
After a white move to D8
and flip (among others) D5, which allows him to take over
corner A8 during the next turn. Black is then unable to flip D5
back.
In the same way, the only disc B1 allows White to take over corner
A1: White plays C1, threatening to play A1 next turn. In order
to prevent it, Black cannot help but flipping the disc by means
of playing D1. Unfortunately, thanks to E1, White still can
play A1. Black made a fatal mistake playing C B1.
Notice that playing a C squares is a drawback only when the C square
is disconnected from the border discs.
Insertion- We already saw borders are very important. It has an immediate impact
on the way to play borders. Let us deal with the southern
border of following picture. If Black plays C8, he has the
opportunity to take over corner A8 and White will be
helpless. The reason why is that disc C8 cannot be flipped,
because he is surrounded by two white discs: the black disc is
"inserted".
What happens then on the eastern border? Should Black play H6, he
cannot "insert" because White will flip H5 (in the same way, on
H5, White responds with H6). Let us now have a close look at
the northern border. Playing C1, White must take D1 back not to
lose control over corner A1, but then Black inserts at E1, and
thus takes over the corner next move.
It appears that if there is an uneven number of free squares between
two discs of the same colour (white in the example above), the
opponent can "insert" (lower and upper border), whereas if the
number is even, insertion can be avoided (eastern border).
Remembering not to play a C or X square, many beginners implement a
wrong strategy consisting in assigning a given quotation to
each square, without regard to the position on the board. In
such an approach, corners are the most interesting squares,
followed by border squares and other C squares. Central squares
are given a neutral quotation whereas C squares and especially
X squares are regarded as the weakest ones. At each turn of the
game, they try to play the square with the biggest quotation,
so long it is a legal move.
Unfortunately, such a strategy is bound to fail, as we make clear
further.
Mobility- We reported before that one should avoid playing in the neighbour
squares of the corners not to make the latter an easy take for
the opponent. There is however a case where one cannot help
doing so: if it is the only available legal hit. Let us have a
close look at following setup:

White has only few possible moves. If Black plays E8, there will only be
two moves left for White, B2 and G2:
After Black's ply in E8
But, according to the rules, White will be obliged to play one of
these two moves. By playing B2, Black can take corner A1, and
if White plays G2, Black can take over corner H1. Moreover,
because of the upper six squares border, Black will be able to
take the remaining corner as soon as he has taken over A1 or
H1.
Mobility (2)- We discover here a good strategy for playing Othello. Your opponent
will never play a C or X square if he has other
possibilities. Your aim is to force him to do so. To achieve
this goal, one must reduce the opponent's options until he can
only play one or two poor move, as seen in the example
above. White is cornered, and can only play a poor move which
ensures victory for Black. Hereafter another example:
It'S Black's turn
If Black plays G6, there is but one legal move left for White:B2. Of
course, Black has no disc on diagonal B2-E5, so he will not be
able to take over corner A1 straight away, but can easily cross
this diagonal, by playing E1 that flips C3 for example:
After G6-B2-E1
In the last two examples, Black had a very good mobility because he
could chose among numerous good moves, whereas White had but a
couple of possibilities and all options where rather poor ones:
White's mobility is very low.
Generally, your goal is to reduce the number of "free options" (the
number of possible moves) your opponent can chose from, while
increasing your own range of options. It is usually known as
"mobility strategy"
The frontier- Each move has to be played on a free square next to an opposite
disc. This basic rule will guide us in chosing the right
move.
At each turn, you must flip at least one opposite disc. It then makes
sense that the more opposite discs are next to free squares,
the more move options you have, and the better your own
mobility. On the other hand, if only few of your discs are next
to a free square, your opponent will not have many options. A
disc next to a free square is called an outer disc, the
remaining discs are known as inner discs. The whole set of
outer discs is called frontier.
As a result of it, it seems obvious to try and reduce the amount of
outer discs.
The frontier (2)- Let us now have a look at three pictures showing slightly different
setups. How can we assess a black move at A6 in each of the
three setups below?
The frontier (3)- In the first picture, a black move at A6 would be disastrous: after
White's G1, Black would be forced to give a corner up (he would
only have B1, G2 or H2 as legal moves left). Playing A6 is a
very bad idea as it flips a lot of the outer discs (those on
line 6) and creates on this line a wide black frontier which
Black cannot cross.
Playing A6 in the second setup is a better choice because, among the
flipped discs, only B6 and C6 are on the borderline. However,
this move deprives Black of a certain number of "doors" to
squares that can prove strategic later on in the game, A7 for
instance. Perhaps playing E7 would be a better choice because
if flips less frontier discs.
On the other hand, the best move on the third picture is A6. Indeed,
if White counters with B2 or G2, he sacrifices a corner and by
playing G1 (the only optional legal move), Black can play A7
and White is forced to give a corner away (he can only play B2
or B7). On the picture, A6 is called quiet move because it does
not flip any frontier disc (after move A6, B5 is no longer an
outer disc).
The weaknesses of a straightforward evaluation of the squares in a
position strategy appear clearly: the most important is not
necessarily the square one choses but rather the discs one
flips for each optional move.
One way to reduce the opponent's mobility (and above all to avoid
reducing one's own) will be not to flip too many frontier
discs. It is better having discs placed in the centre of the
position (that is to say discs that are not next to a free
square) than having outer discs. It is the so called center
mastery strategy.
Time, waiting moves- Let us consider following picture: the northern frontier is split
between the two players.
Black must play
It is Black's turn to play. He can contemplate a move to the north
(E2, D2 or C2 are fairly good), but he will of course prefer
White playing first in this area and hereby widening his
frontier. The latter is a paradoxical property of Othello: it
is often bad to be forced to play because one flips opposite
discs and run the risk to open new moves for the
opponent. Furthermore, if Black does not want to play north, he
can only chose the southern side. He then can chose from two
wise moves C8 and D7. What would happen if Black plaid C8?
White, that wants to avoid north, counters with D7, and Black
is forced to open a breach northwards first.
On the other hand, if Black plays D7, the only plausible move
southwards for White is C8, and Black counters playing B8. One
says that Black won time in the southern area. White is hence
forced to play first north.
A basic definition of winning extra time would be to say that it is
playing a move more than the opponent in a given area of the
board (usually a border row) and doing so to force the opponent
to initiate the game elsewhere, which is a byword for widening
the frontier.
After C8-D7
After D7-C8-B8
Time, waiting moves (2)- Hereafter another example of winning extra time on a border:
Black must play
Not to open the game in the northern area, Black seeks to win time on
the southern border. How can he manage? How to chose between C8
and F8? One could think these two moves are equivalent with
sequences C8-F8-G8 and F8-C8-B8.
In both cases, Black wins time and White is forced to open north.
However, by casting a closer glance at White possible counter moves,
one notices that if Black plays C8, White has a better move
than F8 to play: G8!
Thus Black is deprived of all good moves southwards (if Black plays
F8, White takes over the border playing B8) and must play
north: he has not won enough time. In such a position, Black
will be forced to play F8 to spare some precious time.
After C8-F8-G8
After F8-C8-B8
Time, waiting moves (3)- Of course, winning several extra times is possible, not to mention
that the opponent is then in dire straits because he will be
forced to play one or more moves before you widen your own
frontier. Here is an example:
Black must play
After Black A7
If Black plays A7, White is in dire straits. As a matter of fact,
White can chose from four wise moves: G6, F2, E2, D2, but he
will not be able to play the four of them. To be more precise,
he will only be able to play one of the latter, because they
all flip the same black disc, so that there only remains two
different moves.
On the top of that, Black can win two extra times on the western
border: he can play A3 then A2! Hereafter the resulting setup
of sequence E2-A3-G6-A2 for instance:
White is now forced to give corner A8 away. Thanks to its triple
extra time on the western border, Black forced White to close
his frontier completely.
Time, waiting moves (4)- Winning extra times allows one to force the opponent to widen its
frontier. Unfortunately, extra times won on the borderlines
often imply positional weakness: a player endeavouring to win
extra times at all costs will be confronted with hazardous
border configurations (cf. section on insert moves and
five-borders).
Moreover, border discs will impact on future flips: the player will
often be obliged to flip discs in several directions at a
time. Thus, as depicted below, Black tried to win extra times
by playing towards the northern and southern border, but is now
forced to play westwards, and to flip discs in several
directions. As a result of that, he will put more black discs
within the frontier as he originally wanted to:
Black must play
Creeping along edges- Let us tackle the issue of a game strategy that brings the extra time
principle to its climax. It's referred to as 'creeping along edges'. One of the players
gives the center of the board up and rather plays moves on the
borders. Here is an example:

Black must play
The player who is trying to creep along edges takes one or more consecutive borders and leaves the
center and its frontier to the opponent.
If the trick works, the opponent runs short of options because he
cannot flip the opposite discs located beyond the border. Thus,
in the picture above, Black can play H7. White has then only
one wise move left, C7, and Black counters with C8. White is
now forced to give a corner away by playing G7:
Creepign along edges (2)- The main drawback of this trick is its random efficiency. If the opponent
manages to hold on and keep some options, the player will be
handicapped by his own borders, giving him a strong
influence. Thus, on following picture, Black probably failed
his creeping attack.
Black must play and he is obliged to open White's frontier. By
flipping in many directions, he creates new options for White
who is far from conceding a corner.
One could summarize 'creeping along edges' as a strategy in the short run: the opponent
must be deprived of its options very quickly. The shortcomings
of such a strategy are to be found in the long run:
five-borders, weak borders, influence. Thus, a successful creeping
is often responsible for an easy victory, but a failed one is
in most cases fatal.
Parity- This very important item is sort of a complement of mobility. If none
of the players passes during the game, there is an even number
of free squares when Black's turn has come. When White's turn
has come, the number is uneven. To conclude, White plays the
last move of the game, and therefore has a slight advantage, as
the disc he places and the discs he flips are positively
definitive ones.
On the following picture, Black must play G8 (only available move),
White counters with H8 and wins. But if it were White's turn to
play, he would place a disc on either G8 or H8, Black would
play the remaining move and win.
Black must play
This advantage can be even bigger if White plays the last move in
several "even" areas (areas with an even number of free
squares). Just cast a glance at following picture: there are
four clearings of two squares left. Black will be forced to
play at first in both of them, because White will always
counter in the same clearing, that is to say in the same even
area. As a result of this, the game can end with sequence
G2-H1-G7-H8-B7-A8-B1-A1 and White wins 24-40:
Black must play
The initial parity is also in favour of the white side. However,
Black has a way to turn it into a strength: should one of the
players pass once, the parity reverses, but if another turn is
passed, we return to the initial setup, so that black must try
and keep an uneven number of "pass" in the game.
Parity (2)- An efficient way for Black to win the parity consists in forcing
White to create an uneven clearing in which he cannot play. In
following picture, White cannot play G8. Black should also
avoid it at all costs. Apart from G8, there remains an uneven
number of free squares when Black's turn has come. He must try
and play in such a manner that after his move, there only are
even clearings left, which is a byword for playing G2:
Black must play
Then White is forced to play at first in both of the north-western
and north-eastern clearings. The game ends with sequence
G2-H1-G1-A1-A2, White passes, Black finishes White by playing
G8 and wins 37-27.
Had Black started with G8, would White had answered G1, leaving two
uneven clearings, and would have won 26-38 as a result of
G2-H1-A2-A1!
Five borders- We are now about to discorver a very usual case of insertion. This
example is also very important as it shows that it is not
always a drawback to play an X square. Let us have a close look
at following picture.
Black must play
We are close to game end, no player managed to stop the other and
Black is up to play. Whatever he does, White takes over a
corner. Let us look closer at what happens on the eastern
border. The five-discs structure in row H is called Five
border. It is a weakness because it often allows the opponent
to sacrifice the corner. Let us give a detailed description of
the mecanism in our example. If Black plays squares X G2, White
can take over corner H1, but then Black inserts at H2:
After G2-H1-H2
Corner H1 allows White to keep up the northern border: he owns 7
definitive discs. On the other hand, Black's insertion at H2
allows him to play H8 (a corner!) next turn and then A8
(another strategic corner!). Thus, he owns 14 definitive discs,
and probably the western border as well, thanks to corner A8;
furthermore, he can play G7: corners' exchange is clearly in
favour of Black. To conclude, white's five border on the
borderline of the board made a good square out of G2 with the
initial setup. Indeed, it is a bit more complicated for real:
White is not forced to take over the corner at all. On the top
of that, this move results in a corners' exchange. So, each
player should decide if such a swap is positive or not: it all
depends on the fate of the other borders and on the amount of
positive discs one could possibly retrieve of it. However, such
a move generally means winning extra times by playing the X
square.
Five borders (2)- It is wrong to believe that this sacrifice works each time. Without
getting into details, hereafter are somes examples of vain
sacrifices:

Black must play
In the picture above, White has two five borders, north and
west. However, none of them is attackable. If Black plays B2,
White plays B1 (without flipping B2) and will then play A1,
with no insertion opportunity for Black. If Black plays B7,
White plays A8 and Black cannot insert either (at A7); White
will be able to play there next turn.
Following setup is a bit more subtle: what happens if Blacks attacks
White's border westwards by playing B7? White counters with A7,
controlling diagonal F3-B7, and Black cannot take over corner
A8, what White will be able to do next turn thanks to its
insertion at D8. Here again, Black failed in attempting to
insert.
Black must play
To conclude on the borders, let us stress that what happens in the
sequence detailed above is called booby trap. It is easy to
get: the usual sequence of moves on the western border does not
work because of White's control of the diagonal. There are
other examples of booby traps and one should always check
thoroughly that the opponent cannot play a sequence of
unforeseen moves that would make your corner sacrifice
useless.
Stoner's trap- We just saw that attacking a five borders does not necessarily imply
exchanging corners. Indeed, the defending player decides wether
he takes the corner or not. We will now look at a more
elaborate corner attack, which ensures the takeover of a
corner. Like the attack on a five border, Stoner's trap results
in a corner exchange but this time, if the trap is set up
properly, there is no way for the defender to escape.
Stoner's trap works in two steps: the attacker takes control over a
diagonal playing an X square, then he attacks the weaker border
(the one with a C square) of the opponent, threatening to take
over the corner. The opponent cannot counter by taking the
border back because that would mean flipping the X square he
played last turn. Let us study the example below.
Stoner's trap (2)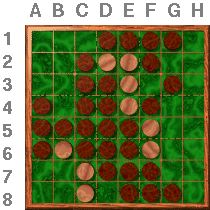
White must play
In this position, Black has a weak southern border
configuration. White plays B7 and takes control over diagonal
E4-B7:
Black still cannot take over corner A8, and he will probably try and
cross the diagonal to gain access to this corner, for instance
with F3. But now, White plays its offensive square D8:
Black cannot avoid to lose corner H8 and at least 6 definitive discs
on the southern border. If Black counters with B8, he flips B7,
thus giving up A8 and H8. Should Black take over corner A8,
White takes over H8 straight away, and could even insert at B8,
still keeping a link to H8. Moreover, even if Black neither
plays A8, nor B8, White definitely keeps access to H8, hence
the difference from a five border attack.
After B7-F3-D8
Stoner's trap (3)- In the same way as with the five border, setting up the trap is not
always possible and it is necessary to check that the move
sequence is correct. In following example, the Stoner's trap
will fail:
White must play
If White wants to set up a Stoner’s trap playing B7, Blacks counters
with C3 and White cannot play C8 before Black takes over corner
A8. There is an even number of free squares left on the
southern border and White cannot insert any more.
Conclusion- We have tried in these few pages to give you an appreciation for the
complexity of the game of Othello. Though the rules are simple,
Othello remains a great classic among strategy games.
Of course, this small introdution cannot discuss all that has been developped
in 20 years of Othello playing, but our wish is that the few
ideas which we have given you throughout this initiation will
permit you to better appreciate your next Othello gmaes. If you
would like to know more, the
FFO
would be happy to comply with the articles of its Forum
magazine, books on Othello, club meetings, tournaments, ...
Glossary
C- and X-squares : C-squares are the squares at a2, a7, b1, b8, g1, g8, h2, and h7. X-squares are the squares at b2, b7, g2, and g7. These squares should only be occupied with care.
Center : The center of a position is the set of interior discs.
Control of the center : Strategy which consists of trying to have as many of your discs as possible in the center of the position and as few as possible along the frontier for the maximum possible mobility.
Corner : The corners are the squares at a1, a8, h1, and h8. They are often very good squares to occupy.
Edge creeping : Strategy which consists of gaining the maximum number of moves on one or two edges at the expense
of edge weaknesses (unbalanced edges, ...). The creeper tries to very quickly run his adversary out of moves by
leaving him the entire frontier but if it doesn't work, the influence from his bad edges will rapidly weaken his
position.
Frontier : The set of external discs, that is to say discs which are adjacent to an empty square.
Gain a tempo : Playing one more move than your opponent in a region of the Othello board and forcing him to
initiate play elsewhere (thus lengthening his frontier).
Influence : One says that a players discs exercise influence when they force him to flip discs in several
directions at the same time.
Internal/external discs : An internal disc is a disc which isn't adjacent to an empty square. It is strategically
bad to have no interior discs.
Liberty : Non-catastrophic moves. "To be short of liberties" : to have to give up a corner in the near future.
Maximum disc strategy : Incorrect strategy, applied by many beginners, which consists of trying to flip the
maximum number of discs on each move.
Mobility : Number of possible moves available to a player. By extension, a player has good mobility when he has a
large number of possible moves.
Parity : Strategy which consists of leaving an even number of empty squares in each region to which your opponent
has access.
Quiet move : A move which flips no frontier discs. Often excellent.
Stable discs : Discs which can never be flipped. A corner is an example of a stable disc.
Stoner Trap : Attack of a weak edge position which leads to a forced exchange of corners.
Unbalanced edge : Edge formation consisting of 5 discs of the same colour, adjacent to each-other, none of which
is a corner disc.
|
|
